You just spent 3-4 months babying your plants through the complete growing cycle, checking them daily, adjusting nutrients, and now you're staring at this mountain of freshly harvested buds covered in leaves. If you followed our harvest timing guide, you nailed the perfect moment to chop. But now comes the part nobody warns you about – trimming.
My first harvest took 8 hours for just 2 plants. My hands cramped so bad I couldn't hold a coffee cup the next morning. The scissors got so sticky I could barely open them. Half my trim ended up on the floor because I didn't know it was worth saving.
How to Trim Your Pot PlantTrimming sucks, but doing it wrong is worse. Here's everything I wish someone had told me before I destroyed my hands and wasted perfectly good trim material.
Pruning Cannabis Plants vs Trimming (What's the Difference?)
Let's clear this up because everyone gets confused. Pruning happens during the grow – that's when you're removing fan leaves, lower branches, and shaping the plant. We cover that extensively in weeks 3-5 of the growing guide. Trimming is what you do after harvest – cleaning up those buds by removing sugar leaves and stems.
People mix these up constantly. When someone asks "how to prune cannabis plants," half the time they mean trimming. If you're looking for actual pruning techniques during the grow, that's different. Today we're talking about post-harvest trimming – turning those leafy harvested colas into the clean, tight buds you see in dispensaries.
There's also maintenance pruning during flowering, which we'll touch on later, but the main focus here is getting your harvested buds ready for drying and curing.
Wet Trimming vs Dry Trimming: Which is Better?
This is the eternal debate in growing forums, and honestly, both sides have valid points.
Wet Trimming (Right After Harvest)
Wet trimming means you trim immediately after cutting the plant down, while everything's still fresh and green.
Pros: The leaves stick straight out when wet, making them way easier to cut. Your workspace stays cleaner because wet leaves don't crumble everywhere. It's generally faster – I can wet trim a plant in about half the time it takes to dry trim.
Cons: Your buds dry faster without those protective leaves, sometimes too fast. You're handling wet, delicate buds that can get damaged easily. The trim isn't as good for making hash because the trichomes are still wet.
Best for: If you live somewhere humid where mold is a constant threat, wet trimming helps prevent disaster. It's also better if you have dense, chunky buds that hold moisture. During my outdoor harvests in late September when humidity spikes, I always wet trim.
Dry Trimming (After Drying)
Dry trimming means hanging your plants whole for 7-14 days, then trimming after they've dried.
Pros: The slower dry time from leaving leaves on leads to a smoother smoke and better terpene preservation. Your trim makes better hash and extracts. Many argue the final product quality is noticeably better.
Cons: It takes forever. The leaves curl into the buds making them harder to remove. Everything gets ridiculously sticky. Your trimming area becomes a mess of crumbled leaf bits.
Best for: Low humidity climates where you can afford a slow dry. If you're not in a rush and want the absolute best quality, dry trim wins.
The Real Answer
Most experienced growers do a hybrid approach. Remove the big fan leaves while wet (they have no trichomes anyway), then hang to dry with sugar leaves on. After drying, do a final trim of the sugar leaves. This gives you the best of both worlds – easier fan leaf removal and quality preservation from leaving sugar leaves on during drying.
Do what fits your environment and patience level. There's no trim police coming to check your technique.
Tools You Actually Need to Trim Cannabis
Before you grab those kitchen scissors, stop. The right tools make the difference between finishing in 2 hours versus 6 hours with destroyed hands.
Scissors (The Most Important Choice)
Spring-loaded trimming scissors are non-negotiable. Fiskars micro-tip or Chikamasa are the go-to brands. Regular scissors will destroy your hand after 20 minutes – that repetitive squeezing motion is brutal. Spring-loaded scissors pop back open automatically.
You need at least 2 pairs. While one soaks in rubbing alcohol to remove resin, you use the other. When scissors get sticky (every 15-20 minutes), swap them out.
Curved vs straight blades? I prefer straight for precision work and curved for speed trimming. If you're buying one pair, go straight.
Cannabis Trimming Tray Setup
A proper cannabis trimming tray changes everything. The Trim Bin is popular – it has a screen bottom that collects kief while you work. But honestly, any setup with a 120-150 micron screen over a collection tray works.
My DIY version: a wooden frame with silk screen stretched over it, sitting on a glass baking dish. Cost me $20 versus $60 for a commercial trim bin. The key is having somewhere for the trim to fall and the kief to collect.
Other Gear That Actually Matters
Nitrile gloves if you hate sticky fingers. Some people love the finger hash you collect without gloves, but I can't stand the cleanup.
99% isopropyl alcohol for cleaning scissors. Don't use 70% – it doesn't cut through resin as well.
Separate containers for different grades of trim. Keep sugar leaves separate from fan leaves – you'll see why in our trim usage guide.
Good lighting – seriously, a bright LED desk lamp makes spotting stray leaves 10x easier.
A comfortable chair – you'll be sitting for hours. Your back will thank you.
How to Clip a Weed Plant: Step-by-Step Trimming Process
Here's exactly how to trim your pot plant without wasting time or material.
Step 1: Set Up Your Workspace
Position your light source directly above your work area. Get everything within arm's reach – scissors, alcohol, containers, trimming tray. Queue up a long podcast or playlist because you'll be here a while. I learned this the hard way after having to get up 20 times during my first trim session.
Step 2: Remove Fan Leaves First
Start with the big fan leaves – the ones with long stems and no visible trichomes. Cut them at the base where they meet the stem. Don't pull them off; you'll damage the bud structure.
These fan leaves go straight to compost. They have minimal cannabinoids, though some people juice them or use them for topicals.
Step 3: Trim Sugar Leaves
Now for the real work. Hold the bud by its stem, rotating slowly. Sugar leaves are the smaller leaves growing from the bud itself, usually covered in trichomes (that frosty appearance).
Angle your scissors to follow the natural bud shape. You're not trying to create a perfect sphere – follow the bud's natural contours. Snip leaves that stick out beyond the bud mass. The goal is a clean appearance while preserving as many trichomes as possible.
Critical: Keep these sugar leaves separate from fan leaves. They're loaded with trichomes and perfect for making edibles or concentrates. Throwing them away is literally throwing away THC – check our guide on what to do with trim.
Step 4: Clean Up Stems
Trim excess stem, leaving about 1/4 inch for handling during cure. Any longer and you're adding unnecessary weight and harshness. Remove any damaged, discolored, or suspicious-looking spots – if you see anything that might be mold or bud rot, cut wide around it. Better safe than sorry. If you're unsure about plant health issues, our diagnostic system can help identify problems.
Step 5: Final Inspection
Rotate each bud under good light. You'll always spot a few leaves you missed. Don't over-trim though – some growers intentionally leave more sugar leaves for a slower cure and to protect trichomes. There's a balance between bag appeal and trichome preservation.
Speed Tips for Trimming Large Harvests
After a few harvests, you learn shortcuts that cut trimming time in half:
Batch processing is key. Do all fan leaves on all plants first, then move to sugar leaves. It's faster than completely finishing one bud at a time.
Two-scissor rotation keeps you moving. One pair soaks while you use the other. When the working pair gets sticky, swap immediately. No downtime.
The 80/20 rule saves hours. Getting buds 80% trimmed takes 20% of the time. That last 20% of perfection takes 80% of the time. Unless you're entering a cannabis cup, good enough is good enough.
Machine trimming starts making sense around 5 pounds. Below that, the cost and trichome loss aren't worth it.
Real timing: Expect 1-2 hours per plant for decent hand trimming. Anyone saying they hand-trim a plant in 30 minutes is either lying or doing a terrible job.
Dealing With Sticky Scissors and Hand Cramps
The Scissor Hash Problem
Your scissors will become completely gummed up every 15-20 minutes. The resin builds up until they won't open properly. Keep a small jar of 99% isopropyl nearby. Drop the gunky scissors in, swirl for 30 seconds, wipe clean, and they're good as new.
Some people freeze their scissors between uses – cold resin is less sticky. Others collect the "scissor hash" by scraping it off. I just clean mine, but that scissor hash is basically pure trichomes if you want to smoke it.
Your Hands Will Hurt
Even with spring-loaded scissors, trimming is repetitive strain at its finest. Take a 5-minute break every 30 minutes. Seriously, set a timer. Stretch your fingers, rotate your wrists, shake out your hands.
The second day is always worse than the first. Your hands will be sore in muscles you didn't know existed. Ibuprofen before bed on trim day isn't a bad idea.
What to Do With All That Trim
This deserves its own article (and we have one: What to Do With Cannabis Trim), but here's the quick version:
Sugar leaves (the frosty ones) are gold. Save every bit for:
- Cannabutter or oil
- Bubble hash
- Dry sift
- Tinctures
Fan leaves have minimal THC but work for:
- Compost
- Juicing (if fresh)
- Topicals
Never throw away sugar leaves. That's literally throwing away cannabinoids you spent months growing.
How to Trim Your Weed Plant During Flowering (Maintenance Pruning)
Quick note on trimming during the actual grow, since people search for this:
During flowering, you might remove lower growth (lollipopping) in weeks 1-3 of flower to focus energy on top colas. Some growers do selective defoliation throughout flower to improve light penetration. But stop any major pruning by week 4 of flower – you want the plant focusing on bud development, not recovery. This is all covered in our week-by-week growing guide.
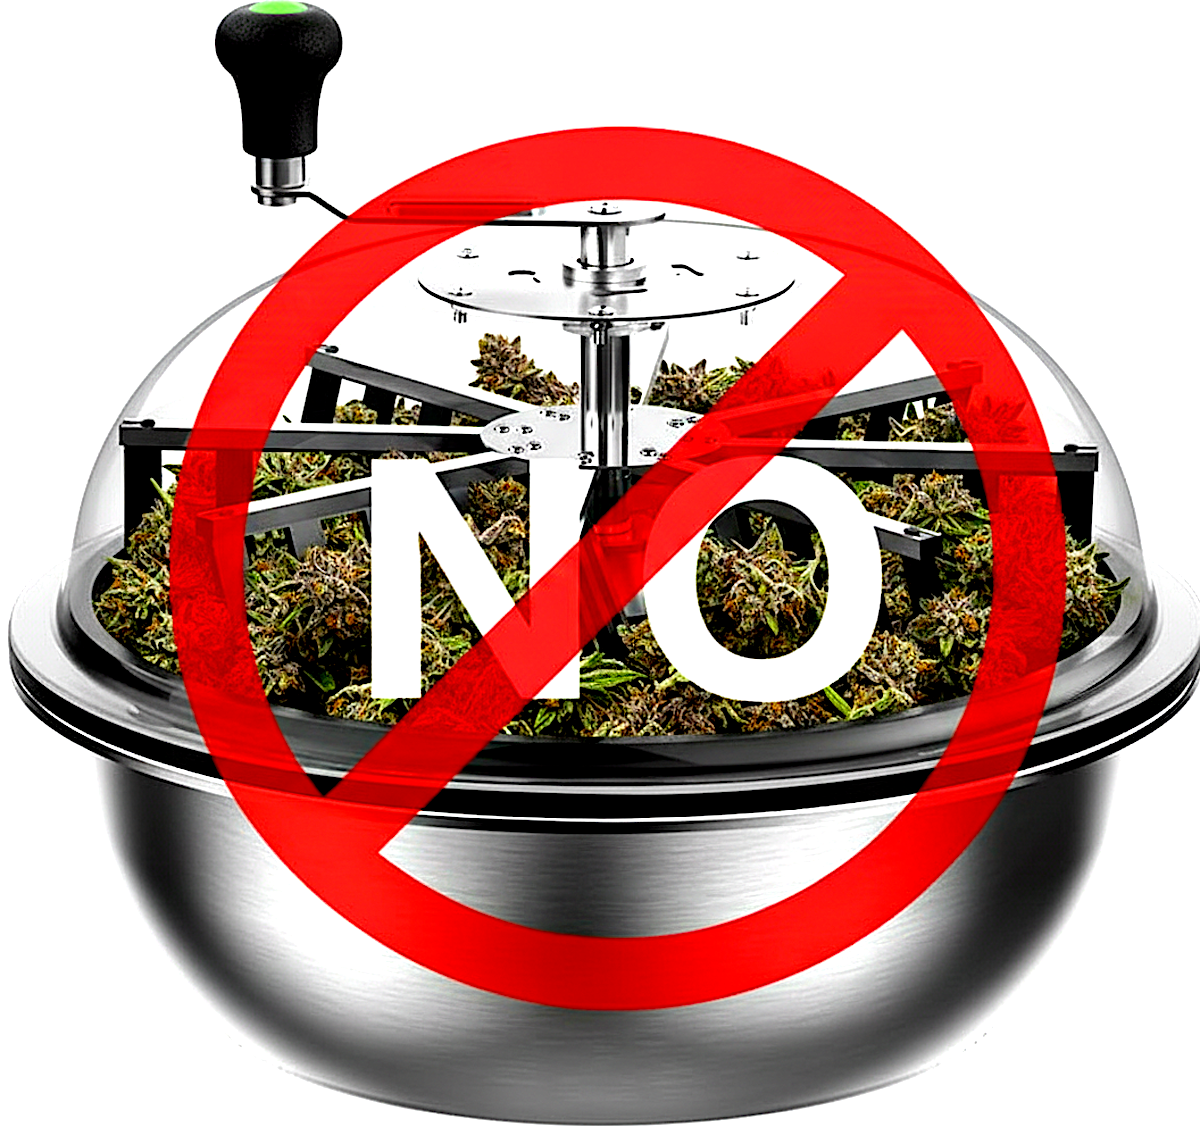
Machine Trimming vs Hand Trimming
When Machine Trimming Makes Sense
If you're processing 5+ pounds regularly, a trimming machine becomes worth it. Commercial operations have no choice – hand-trimming 100 pounds would take weeks. When time is more valuable than perfection, machines win.
The Downsides
Machines beat the hell out of your buds. You lose 10-30% of trichomes to the machine. Buds come out looking uniform but overworked. They lose that hand-crafted appearance that commands top dollar. And decent machines start at $300 for basic bowl trimmers, up to $3000+ for professional units.
The Verdict
Hand trim your personal grows. The quality difference is noticeable, and for a few plants, it's manageable. Machine trim only makes sense for commercial volumes or if you physically can't hand trim due to arthritis or other issues.
Common Trimming Mistakes (And How to Avoid Them)
Over-trimming: Shaving buds down to nothing because you want them "perfect." Leave some sugar leaf for protection and slower curing.
Under-trimming: Leaving so much leaf that your buds taste harsh and burn poorly. Find the middle ground.
Trimming too wet: Manhandling soaking wet buds damages trichomes and affects structure. If wet trimming, be gentle.
Throwing away sugar leaves: I see new growers do this constantly. That trim is valuable – save it!
Not cleaning scissors: Trying to power through with gummed-up scissors takes twice as long and gives worse results.
Bad posture: Hunching over your work for hours destroys your back. Sit properly with good support.
Rushing: Tired trimming is sloppy trimming. Better to do it over two days than rush and waste months of growing.
Bottom Line: Your Trimming Strategy
Your approach depends on your environment and priorities. High humidity? Wet trim to prevent mold. Want maximum quality? Dry trim with patience. Most of us land somewhere in the middle with a hybrid approach.
Invest in proper spring-loaded scissors – your hands will thank you. Set up a proper cannabis trimming tray to catch that valuable kief. Don't throw away sugar leaves (seriously, read our trim guide). Accept that it's going to take longer than you think. Remember that perfect is the enemy of done – those last few tiny leaves won't affect the smoke.
If you started with quality seeds and followed proper nutrient management, you've got buds worth trimming right. Don't rush this final step.
Now that your buds are perfectly trimmed, the next critical step is proper drying and curing. Mess that up and all your trimming work was for nothing. Check out our complete drying and curing guide to make sure these beautifully trimmed buds reach their full potential.
Need help with other stages of growing? Check out our complete indoor growing guide or if you're dealing with issues, our plant health diagnostic system can help identify and fix problems before they ruin your harvest.