Follow along as I document my entire indoor cannabis grow from day one! I'm starting completely fresh with a budget-friendly setup and sharing every success, mistake, and lesson learned. Whether you're a complete beginner or looking to improve your technique, this real-world grow journal will give you the confidence to start your own indoor garden. Growing Cannabis Indoors doesn't have to be over complicated :)
About This Grow Journal
My Background: I've been curious about growing cannabis for years but never took the plunge. After researching for months, I finally decided to document my first serious indoor grow from start to finish. I'm sharing the real story - including mistakes, problems, and solutions - so you can learn from my experience.
My Goals:
- Prove you can grow quality cannabis on a reasonable budget
- Document what actually works (and what doesn't) for beginners
- Show week-by-week progress with real photos and honest updates
- Create the guide I wish I had when starting
Quick Overview of My Setup:
- Space: Converted bedroom closet (3x3 feet)
- Budget: Under $600 total investment
- Strain: Northern Lights Auto (beginner-friendly)
- Growing Medium: Organic soil mix
- Expected Timeline: 16-20 weeks seed to harvest
Note: I'm growing legally in my state with proper permits. Always check your local laws before growing cannabis.
Pre-Grow Planning & Setup (Week -2 to 0)
Choosing My Setup
After weeks of research (and probably too much time on growing forums), I settled on a beginner-friendly but quality setup. Here's what I chose and why:
Grow Tent: VIVOSUN 36"x36"x72" ($89)
- Perfect size for 2-4 plants
- Good quality zippers and reflective interior
- Fits perfectly in my closet space
Lighting: Spider Farmer SF-2000 LED ($299)
- Full spectrum LED with Samsung chips
- Covers 3x3 area perfectly
- Much lower heat than HPS lights
- 5-year warranty gave me confidence
Ventilation: 6-inch inline fan kit ($119)
- VIVOSUN 6-inch fan with carbon filter
- Keeps temperature and odor under control
- Quieter than I expected
Additional Equipment:
- Digital timer ($15)
- pH test kit ($25)
- Thermometer/hygrometer ($12)
- Small oscillating fan ($18)
- 5-gallon fabric pots ($20)
- Fox Farm Ocean Forest soil ($35)
Total Setup Cost: $632
Seeds and Strain Selection
I chose Northern Lights Autoflower from ILGM for my first grow because:
- Extremely beginner-friendly genetics
- Compact size perfect for my space
- Autoflowering means no light schedule changes
- High success rate for new growers
- 10-12 week seed to harvest timeline
I ordered 10 feminized auto seeds ($89 with shipping) and got 10 free seeds as a bonus. The packaging was discrete and arrived in 8 days.
Setting Up the Space
Day -14: Spent the weekend setting up my tent in the bedroom closet. The closet is perfect - it's 4 feet deep and has good access to electrical outlets.
Challenges I didn't expect:
- The tent was bigger than expected (measure twice!)
- Needed to rearrange closet completely
- Had to run an extension cord for the fan
- Assembling the tent took 3 hours (YouTube helped!)
Day -7: Installed the lighting and ventilation. The SF-2000 is heavier than expected but the included hanging kit works great. Set the light about 24 inches above where plants will be.
Day -3: Did a full system test - lights, fans, temperature monitoring. Everything running smoothly. Tent maintains 75°F with lights on, 68°F with lights off. Perfect!
Week 1: Germination & First Sprouts
Day 1 (Monday): THE BIG DAY! Started germinating 3 Northern Lights Auto seeds using the paper towel method. Here's exactly what I did:
- Moistened paper towels (not soaking wet)
- Placed seeds between towel layers
- Put in plastic bag to maintain humidity
- Stored in warm, dark place (on top of my water heater)
- Set reminder to check every 12 hours
Day 2 (Tuesday): Checked seeds this morning - no action yet. This is normal according to my research, but I'm definitely anxious! Checked again at night, still nothing visible.
Day 3 (Wednesday): BREAKTHROUGH! Two seeds showing tiny white taproots this morning. The third seed still looks the same. I've heard 72 hours is typical, so not worried yet.
Day 4 (Thursday): All three seeds now have visible taproots! Time to plant. Here's my planting process:
- Filled small 4-inch pots with Fox Farm Ocean Forest soil
- Made holes about 1/2 inch deep with my finger
- Gently placed seeds taproot-down in holes
- Covered lightly with soil
- Misted soil surface gently with spray bottle
- Placed under lights at 18/6 schedule (18 hours on, 6 hours off)
Day 5-7: Waiting game continues. Soil surface staying moist but not wet. Tent running perfectly at 76°F during day, 70°F at night. Humidity around 65% which seems good for germination.
End of Week 1: Two seedlings broke soil surface on Day 6! Tiny green cotyledons (first leaves) visible. Third seed still hasn't emerged - this happens sometimes. Going to give it a few more days.
Week 1 Lessons:
- Germination requires patience - don't rush the process
- Paper towel method worked perfectly
- Having backup seeds is smart (glad I planted 3)
- Spray bottle is essential for gentle watering at this stage
![Week 1 Photo Placeholder: Two tiny seedlings with cotyledons emerging from soil]
Week 2: True Leaves Emerge
Day 8: Both seedlings showing their first set of true leaves! These look completely different from the round cotyledons - they have the classic cannabis leaf shape with serrated edges. So exciting to see!
Day 10: Plants growing noticeably every day now. Still very small (about 1 inch tall) but the leaves are getting bigger. The third seed never sprouted, so I started another one using the same method.
Watering routine: Using spray bottle every other day to keep soil moist. The key is consistency - never let it dry out completely, but don't make it soggy either.
Day 12: First real challenge! One of my seedlings looked a bit stretched (tall and skinny). Research told me this means the light is too far away. Lowered my LED from 24 inches to 18 inches above the plants.
Day 14: Much better! The stretching stopped and both plants look stockier now. The newly germinated third seed finally broke soil today.
Environment this week:
- Temperature: 74-78°F lights on, 68-72°F lights off
- Humidity: 60-70%
- Light schedule: 18/6 (autoflowers can handle 20/4 or even 24/0, but 18/6 saves electricity)
Week 2 Lessons:
- Watch for stretching - it's a sign lights are too far
- Consistency in watering is more important than amount
- Having backup seeds was definitely smart
- Plants grow faster than expected once they get going
![Week 2 Photo Placeholder: Seedlings with first true leaves, about 1.5 inches tall]
Week 3: Rapid Early Growth
Day 15: Both main plants now have 2-3 sets of true leaves and are about 2 inches tall. Growth is definitely accelerating! The third seedling is catching up quickly.
Day 17: Time for first transplant! The roots are starting to show at the bottom of the 4-inch pots. Moving to 2-quart containers as an intermediate step.
Transplant Process:
- Prepared new containers with fresh Fox Farm soil
- Watered plants lightly 2 hours before transplanting
- Gently squeezed pots and turned upside down
- Carefully removed plants with root balls intact
- Placed in new containers at same depth
- Backfilled with soil and watered gently
Day 19: Transplant shock was minimal! Plants paused growing for about 24 hours, then took off again. This is completely normal.
Day 21: End of week 3 and plants are about 3 inches tall with 4-5 sets of leaves. Starting to look like real cannabis plants! The stems are getting thicker and stronger.
First feeding: Still haven't added any nutrients - the Fox Farm soil has enough food for the first few weeks. Will start light feeding next week.
Week 3 Observations:
- Transplant shock is real but brief
- Growth accelerates significantly after transplant
- Plants are incredibly resilient at this stage
- Starting to develop that distinctive cannabis smell
Week 3 Lessons:
- Don't wait too long to transplant - root bound plants grow slowly
- Intermediate container size prevents transplant shock
- Quality soil eliminates need for early nutrients
- Daily photos help track progress (wish I'd started sooner!)
![Week 3 Photo Placeholder: Three healthy seedlings, 3 inches tall with multiple leaf sets]
Week 4: Vegetative Growth Begins
Day 22: Plants are officially in vegetative stage! All three plants now have 6+ nodes and are growing incredibly fast. Tallest plant is 5 inches, shortest is 4 inches.
Day 24: Started LST (Low Stress Training) on the two larger plants. Here's my simple approach:
- Gently bent main stem to one side
- Used soft plant wire to tie down to pot edge
- Goal is to create horizontal main stem
- This encourages side branches to grow up as main colas
Day 25: First nutrients! Mixed 1/4 strength Fox Farm Grow Big into my water and pH tested to 6.5. Each plant got about 16 ounces of nutrient solution.
My simple nutrient schedule:
- Week 4: 1/4 strength vegetative nutrients
- Feed every other watering
- Always pH test to 6.0-7.0 range
- Plain water between feedings
Day 26: Amazing response to first feeding! New growth is noticeably greener and more vigorous. LST is working great - side branches already starting to grow upward.
Day 28: Had to adjust LST ties as plants are growing so fast. This is a good problem to have! Third plant is catching up quickly.
Environment update:
- Increased light intensity slightly as plants can handle more
- Temperature steady at 76-78°F day, 70-72°F night
- Humidity around 60% - perfect for vegetative growth
- Excellent root development visible at drainage holes
Week 4 Lessons:
- LST is easier than expected and plants recover quickly
- First nutrients make a noticeable difference
- pH testing is crucial - cheap kit works fine for beginners
- Plants can grow an inch per day once established!
Mistakes made:
- Waited slightly too long to start LST (earlier is easier)
- Mixed nutrients too strong first time (learned to start light)
![Week 4 Photo Placeholder: Plants with LST training, side branches growing upward, healthy green color]
Week 5: Training and Second Transplant
Day 29: Time for final transplant to 5-gallon fabric pots! Root development is incredible - white, healthy roots circling the bottom of containers.
Why fabric pots? They allow roots to "air prune" instead of circling, leading to better root development and healthier plants.
Final transplant process:
- Pre-soaked fabric pots to remove sizing
- Mixed fresh soil with small amount of mycorrhizae (beneficial fungi)
- Carefully removed plants from containers
- Teased apart circled roots gently
- Planted at same depth in new containers
- Watered thoroughly but gently
Day 31: Zero transplant shock this time! Plants actually seem happier in the larger containers. Roots have room to spread, and watering is less frequent but more thorough.
Day 33: Continued LST on all three plants. The technique is working amazingly well - instead of one main cola, each plant is developing 4-6 main branches of equal height.
Day 34: Second nutrient feeding at 1/2 strength. Plants are getting hungry! Fan leaves are huge and deep green. Growth rate is almost scary at this point.
Training progress:
- Main stems tied horizontally
- Side branches growing vertically toward light
- Canopy becoming very even
- No stress signs from training
Day 35: End of week 5 and plants are 8-10 inches tall (would be much taller without LST). The canopy is wide and even. Starting to look professional!
Week 5 Achievements:
- Successful final transplant with zero stress
- LST creating perfect even canopy
- Feeding schedule dialed in
- Environment completely stable
Week 5 Lessons:
- Final transplant timing is crucial - don't wait too long
- Fabric pots make a real difference in root health
- LST works better than expected for autoflowers
- Half-strength nutrients seem perfect at this stage
![Week 5 Photo Placeholder: Three plants in fabric pots with LST, wide even canopy, vigorous growth]
Week 6: Pre-Flower Stretch
Day 36: Something exciting is happening! Starting to see pre-flowers (tiny white hairs) at the nodes. This means flowering is beginning soon, even though these are autoflowers.
Day 38: The "stretch" has begun! Plants are growing vertically much faster now as they prepare to flower. This is typical for week 6-7 of autoflower growth.
Height management: Good thing I did LST! Without training, these would be hitting the tent ceiling. As it is, I'm managing height perfectly.
Day 40: Increased nutrients to full strength vegetative feeding. Plants are drinking much more water now - checking daily instead of every other day.
Watering changes:
- Was watering every 3-4 days
- Now watering every 2-3 days
- Each plant takes about 1/2 gallon when dry
- Runoff drains completely (critical for root health)
Day 41: More pre-flowers appearing! Definitely female flowers (I bought feminized seeds, but always good to confirm). Small white pistils visible at multiple nodes.
Day 42: End of week 6 and plants have nearly doubled in height! Now 14-16 inches tall and wide. Canopy is perfectly even thanks to LST.
Environmental adjustments:
- Raised light to 20 inches to accommodate height
- Added second oscillating fan for better air circulation
- Temperature still perfect at 76-78°F
- Humidity naturally dropping to 55-60%
Week 6 Observations:
- Pre-flower stretch is real and dramatic
- LST becomes even more valuable during stretch
- Water consumption increases significantly
- Plants showing clear female characteristics
Week 6 Lessons:
- Height management is critical during stretch
- Increase watering frequency as plants get larger
- Pre-flowers are exciting but expect rapid changes
- Environmental monitoring becomes more important
![Week 6 Photo Placeholder: Plants showing pre-flowers and significant stretch, LST maintaining even canopy]
Week 7: Early Flowering Begins
Day 43: FLOWERING HAS STARTED! Clear pistils visible at every node. Time to switch to flowering nutrients. This is the moment I've been waiting for!
Nutrient switch: Transitioned to Fox Farm Tiger Bloom (flowering formula). Reduced nitrogen and increased phosphorus for bud development.
Day 45: Stretch continues but slowing down. Plants now 18-20 inches tall. More importantly, small bud sites are forming where I see the white pistils.
Day 47: Added Cal-Mag supplement to feeding schedule. Flowering plants need extra calcium and magnesium, and it's better to prevent deficiency than treat it.
New feeding schedule:
- Tiger Bloom at full strength
- Cal-Mag supplement
- Feed every other watering
- pH to 6.0-6.5 for flowering
- Plain water between feedings
Day 48: First real buds forming! They're tiny (pencil eraser size) but definitely developing. So exciting to see after 7 weeks of vegetative growth.
Day 49: Environmental adjustment time. Lowered humidity to 50% to prevent mold during flowering. Added small dehumidifier to my bedroom to help control tent humidity.
Pest prevention: Did thorough inspection for spider mites, thrips, or other pests. Everything looks clean! Good air circulation and environment control are paying off.
Week 7 Highlights:
- Transition to flowering nutrients
- First real bud development
- Stretch phase ending
- Environmental optimization for flowering
Week 7 Lessons:
- Nutrient transition timing is important
- Environmental changes needed for flowering
- Daily inspection becomes more critical
- Patience required - buds start small!
![Week 7 Photo Placeholder: Plants with early bud sites, white pistils clearly visible, healthy green foliage]
Week 8: Bud Development Accelerates
Day 50: Buds are growing visibly every day now! What were tiny white hairs last week are now small but recognizable buds. The genetics are really showing - Northern Lights structure is exactly as described.
Day 52: Time for some defoliation. Removed large fan leaves that were blocking light from reaching lower bud sites. This was scary at first, but research convinced me it's beneficial.
Defoliation approach:
- Only removed leaves blocking bud sites
- Took no more than 20% of total foliage
- Left all healthy leaves on outer edges
- Plants recovered within 24 hours
Day 54: Amazing response to defoliation! Lower bud sites are getting more light and developing faster. Plants don't seem stressed at all.
Day 55: Trichomes! Using my jeweler's loupe (30x magnification), I can see tiny crystal-like trichomes starting to form on the small sugar leaves around buds.
Flowering nutrients working well:
- Buds gaining size daily
- Pistil production increasing
- Plant health excellent
- No signs of nutrient burn or deficiency
Day 56: End of week 8 and buds are golf ball sized on main colas. Smaller bud sites are developing rapidly too. The smell is getting stronger and sweeter.
Week 8 Progress:
- Visible daily bud development
- Successful strategic defoliation
- Trichome production beginning
- Aroma development
Week 8 Lessons:
- Defoliation anxiety was worse than actual impact
- Lower bud sites need light to develop
- Daily inspection reveals rapid changes
- Magnifying glass essential for trichome checking
![Week 8 Photo Placeholder: Plants with developing buds, post-defoliation, visible trichome development beginning]
Week 9: Mid-Flowering Momentum
Day 57: Buds are getting heavy! Had to add bamboo stakes and soft ties to support the main colas. This is a problem I'm happy to have!
Day 59: Trichome production is accelerating rapidly. Sugar leaves around buds are getting frosty with visible crystals even without magnification.
Support system: Added plant yo-yos (retractable plant supports) for the heaviest branches. Much easier than trying to stake everything individually.
Day 61: The smell is getting strong enough that I'm glad I have the carbon filter! Walking into my bedroom, you can smell it even with the tent closed.
Day 62: Nutrients increased slightly - plants are working hard to bulk up buds and can handle more food. Still monitoring runoff pH to ensure no lockout issues.
Bud development observations:
- Main colas now tennis ball sized
- Secondary branches developing nicely
- Pistils still mostly white (not ready yet)
- Trichomes mostly clear with some cloudy
Day 63: End of week 9 and this is where the magic happens! Buds are gaining weight daily and trichome coverage is expanding down the sugar leaves.
Weekly feeding routine now:
- Monday: Full strength Tiger Bloom + Cal-Mag
- Wednesday: Plain water (pH adjusted)
- Friday: Full strength nutrients
- Sunday: Plain water
- Always checking pH and adjusting to 6.0-6.5
Week 9 Achievements:
- Support system installed for heavy buds
- Trichome production accelerating
- Aroma development strong
- No nutrient or pest issues
Week 9 Lessons:
- Bud support becomes necessary quickly
- Carbon filter is essential for odor control
- Feeding frequency may need to increase
- Visual progress becomes more rewarding
![Week 9 Photo Placeholder: Plants with substantial bud development, support stakes in place, heavy trichome coverage]
Week 10: Late Flowering Development
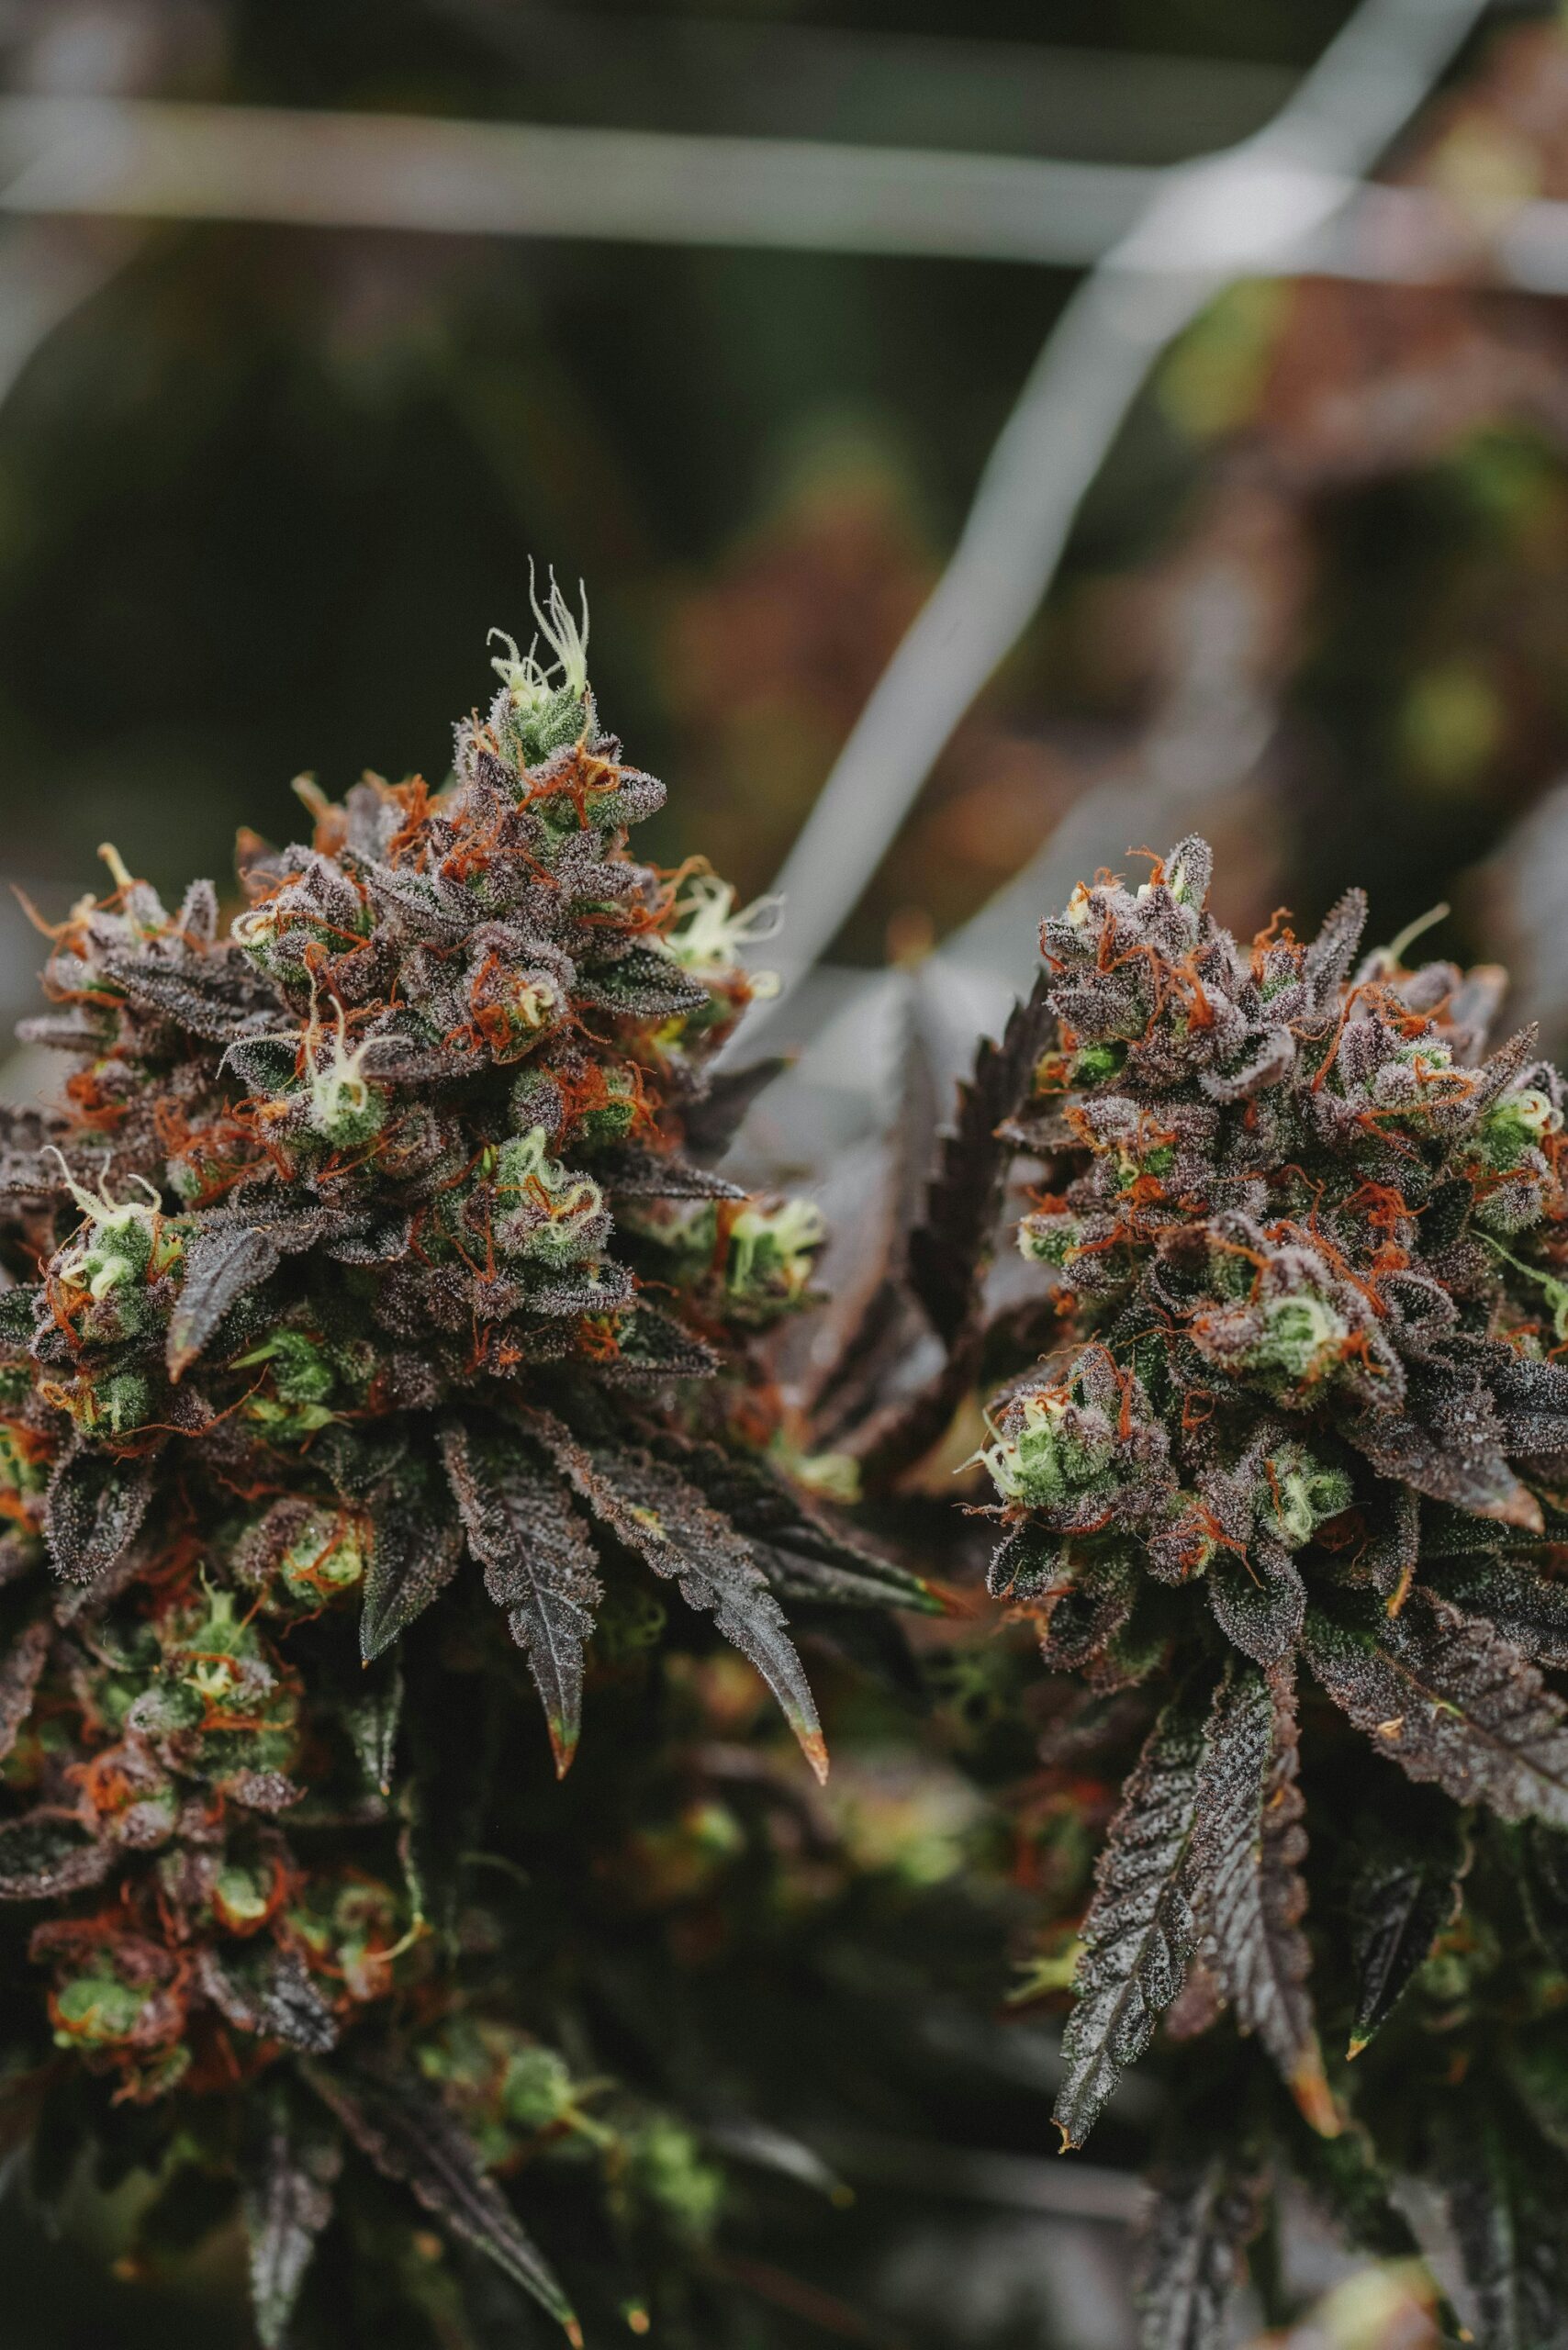
Day 64: This is the week where everything comes together! Buds are dense, heavy, and covered in trichomes. The difference from last week is incredible.
Day 66: Started flushing with plain water only. Many growers debate this, but I want to clear any nutrient buildup from the soil and improve final taste.
Flushing decision: Northern Lights Auto typically finishes around week 11-12, so starting flush now gives 1-2 weeks of plain water to clear nutrients.
Day 68: Pistils are starting to change color! About 20% are turning from white to orange/brown. This is one sign of approaching maturity.
Day 69: Under the jeweler's loupe, trichomes are transitioning from clear to cloudy. Still mostly clear, but definite cloudy ones appearing.
Trichome development stages:
- Clear = too early, low potency
- Cloudy = peak THC, energetic high
- Amber = more sedating, couch-lock effect
- Target: mostly cloudy with some amber
Day 70: End of week 10 and I'm getting excited about harvest! Buds are rock hard, extremely resinous, and the smell is incredible. Northern Lights is living up to its reputation.
Late flowering environment:
- Humidity down to 45% to prevent mold
- Temperature slightly cooler (72-75°F) to preserve terpenes
- Maximum air circulation around buds
- Daily inspection for any issues
Week 10 Highlights:
- Begin flushing process
- Pistil color changes beginning
- Trichome transition to cloudy
- Peak aroma development
Week 10 Lessons:
- Flushing timing is strain-dependent
- Multiple harvest indicators to watch
- Environmental control becomes critical
- Patience required for proper ripening
![Week 10 Photo Placeholder: Dense, resinous buds with changing pistil colors, heavy trichome coverage throughout]
Week 11: Approaching Harvest
Day 71: Daily trichome inspection has become my favorite ritual! Under the loupe, I can see the transition happening - more cloudy trichomes every day.
Day 73: About 50% of pistils have changed color now. Buds are so heavy that even with supports, some branches are bending. The weight is incredible!
Day 75: Trichomes are approximately 70% cloudy, 30% clear. Getting close, but I want to wait for more amber for a balanced effect.
Harvest timing research: For Northern Lights, most growers recommend:
- 80% cloudy, 20% amber for balanced effects
- All cloudy for energetic high
- More amber for sedating effects
Day 76: Reduced watering frequency as harvest approaches. Soil doesn't need to be as moist, and this helps concentrate flavors in the final week.
Day 77: End of week 11 and I think harvest is 3-7 days away! Trichomes are mostly cloudy with first amber ones appearing. Pistils about 70% changed color.
Final preparations:
- Cleaned and sharpened trimming scissors
- Set up drying area in spare bedroom closet
- Prepared hanging lines and fans
- Researched proper drying techniques
Pre-harvest checklist:
- ✅ Trichomes transitioning to amber
- ✅ Majority of pistils changed color
- ✅ Buds at maximum density
- ✅ Drying area prepared
- ✅ Equipment ready
Week 11 Observations:
- Daily changes in trichome development
- Reduced water needs as harvest approaches
- Final preparations critical for success
- Anticipation building!
Week 11 Lessons:
- Harvest timing requires patience and observation
- Multiple indicators better than single metric
- Preparation prevents harvest day stress
- Final week changes happen quickly
![Week 11 Photo Placeholder: Mature plants ready for harvest, mixed cloudy/amber trichomes, 70% brown pistils]
Week 12: Harvest Day!
Day 78-80: Spent three days doing final trichome checks. Perfect timing achieved: 75% cloudy, 25% amber trichomes. Exactly what I wanted for balanced effects!
HARVEST DAY - Day 81: The moment I've been waiting for! Woke up early, had coffee, and prepared for my first cannabis harvest.
Harvest process:
- Final photos - documented the plants before cutting
- Cut entire plants at base of main stem
- Immediate wet trimming - removed all fan leaves
- Rough trim of sugar leaves (will finish after drying)
- Hung branches on prepared lines in drying closet
Harvest results:
- Plant 1: 8 main colas plus numerous smaller branches
- Plant 2: 7 main colas, very dense buds
- Plant 3: 6 main colas (started later but caught up well)
- Total wet weight: Approximately 12 ounces (will lose ~75% during drying)
Drying setup:
- Spare bedroom closet with exhaust fan
- Temperature 65-70°F, humidity 50-55%
- Air circulation but no direct airflow on buds
- Complete darkness
- Hanging branches spaced so they don't touch
Day 82-84: Daily monitoring of drying progress. Smaller branches drying faster than main colas. Smell is incredible - sweet and earthy with pine undertones.
Drying observations:
- Outer surfaces dry first
- Stems still bendable, not snapping yet
- Aroma intensifying as moisture leaves
- No signs of mold or over-rapid drying
Harvest week emotions: Mix of excitement, pride, and slight sadness that the grow is ending! 12 weeks of daily care and attention coming to fruition.
Week 12 Achievements:
- Perfect harvest timing achieved
- Successful harvest and initial processing
- Proper drying environment established
- No major issues during harvest
Week 12 Lessons:
- Harvest timing requires careful observation
- Wet trimming immediately after harvest works well
- Drying environment is critical for quality
- Patience required - process isn't over yet!
![Week 12 Photo Placeholder: Harvest day photos, trimmed buds hanging to dry, impressive cola sizes]
Week 13-14: Drying Process
Day 85-91 (Week 13): Drying week one complete. Smaller branches ready for jarring, but main colas need more time. This is normal - larger buds take longer to dry properly.
Drying progress checks:
- Small stems snap cleanly (ready)
- Large stems still bend but don't snap (need more time)
- Outer buds feel dry but not crispy
- Internal moisture still present
Day 92-98 (Week 14): Perfect timing achieved! All branches now snap cleanly and buds feel properly dried. Time for final trimming and jarring.
Final trimming process:
- Cut buds from branches with clean scissors
- Trim remaining sugar leaves close to buds
- Sort buds by size and quality
- Weigh final dried product
FINAL YIELD:
- Plant 1: 2.8 ounces of premium buds
- Plant 2: 2.4 ounces of premium buds
- Plant 3: 1.9 ounces of premium buds
- Total: 7.1 ounces of dried, trimmed cannabis!
- Additional: 1.2 ounces of sugar leaf trim for edibles
Quality assessment:
- Dense, resinous buds with excellent trichome coverage
- Sweet, earthy aroma with pine and citrus notes
- Perfect cure moisture level
- No mold, pests, or quality issues
Week 13-14 Results:
- Successful 14-day drying process
- Excellent final yield for first-time grower
- High-quality product achieved
- Proper preparation for curing phase
Week 15-18: Curing & Final Results
Curing process: Placed dried buds in glass mason jars, filled 75% full. Added Boveda 62% humidity packs to maintain optimal moisture level.
Curing schedule:
- Week 1: Daily burping for 30 minutes
- Week 2: Burp every other day
- Week 3-4: Burp twice weekly
- Long-term: Monthly checks
Curing improvements noticed:
- Harsh chlorophyll taste disappearing
- Aroma becoming more complex and pleasant
- Smoke becoming smoother
- Potency seeming to increase
FINAL GROW RESULTS:
Total Investment:
- Initial setup: $632
- Seeds: $89
- Nutrients and supplies: $127
- Electricity (estimated): $180
- Total cost: $1,028
Total Yield: 7.1 ounces premium buds + 1.2 ounces trim
Cost per ounce: $145 (compared to $300+ retail in my area)
Quality: Exceeded expectations! Dense, potent, flavorful cannabis that rivals anything from dispensaries.
Final Thoughts & Lessons Learned
What Worked Amazingly Well
- Northern Lights Auto strain choice - Perfect for beginners
- LST training - Dramatically increased yields
- Environmental control - Prevented all major problems
- Quality soil and nutrients - Simplified feeding schedule
- Patient harvest timing - Perfect trichome development
Mistakes Made (Learn From Mine!)
- Started only 3 seeds - Should have started 4-5 for full tent
- Waited too long for LST - Earlier training is easier
- Over-worried about problems - Plants are resilient!
- Didn't take enough photos - Document everything!
Advice for New Growers
Start Simple:
- Choose beginner-friendly autoflower genetics
- Invest in quality basic equipment
- Don't overcomplicate nutrients
- Focus on environment control
Stay Consistent:
- Daily monitoring is key
- Consistent watering and feeding schedule
- Document everything for future grows
- Trust the process and be patient
Learn Continuously:
- Join growing forums and communities
- Read extensively but don't over-analyze
- Every grow teaches valuable lessons
- Start planning your next grow immediately!
Planning Grow #2
I'm already excited for my next grow! Lessons learned will help me:
- Try different strains (thinking Sativa next time)
- Experiment with different training techniques
- Possibly upgrade to larger tent
- Document even more thoroughly
The Bottom Line: Growing cannabis indoors is absolutely achievable for beginners with the right information, quality equipment, and patience. The satisfaction of consuming cannabis you grew yourself is incredible, and the cost savings are substantial.
This grow exceeded my expectations in every way. If you're considering starting your own indoor garden, I hope this detailed journal gives you the confidence to take the leap. The journey from seed to harvest is incredibly rewarding, and you'll learn something new every single day.
Happy growing, and remember to always follow your local laws!
This grow journal is for educational purposes in jurisdictions where cannabis cultivation is legal. Total grow time: 18 weeks from seed to cured cannabis. Always research and comply with your local laws before growing cannabis.
Equipment Links and Resources
Connect with me: Follow my future grows and ask questions on Grow Guide App